|
The $17.61 intelly-I Mouse Project
Basically, solder a short length of wire each to the point on the PCB where the PS/2 wires come in, and then run these pieces of wire back under the PCB to the rear of the mouse (where all the room is), and solder a Resistor leg to one of the wires and then solder it and the other wire directly either to your LED clip legs or the legs on the LED.
Correct polarity is very important (or the LED won't go), also, remember if you are soldering directly to the LED to have some alligator clips or something to divert the heat away from the precious Blue LED, if you are a bad solderer, you will fry that baby.
Polarity of LEDs are easily determined, the negative side is usually the side where the little ridge at the bottom of the LED is cut flat and also the shorter leg is generally the negative leg.
You should be able to do this without any hassles with the computer still going and the mouse plugged in. I myself had my computer on and mouse plugged in and the box beeped at me probably one in every three times I touched the mouse with the Soldering Iron, if you don't trust yourself, do it while the thing is disconnected, for god's sake!
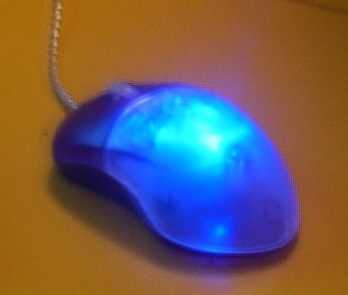
To finish this off, wrap up the connections and joints in some nice Insulation tape (or heat-shrink if you are an upper-class ghettoian), tape everything securely into place, making sure that nothing obstructs your ability to put the darn mouse back together, and aim your LED towards the front end of the mouse, this should make it all glow nicely :o)
 
These shots show the finished product you can roughly see the placement and angle of the light
Now, you can plug it in and leave it at that, or like I usually do, you can make minor improvements.
My main extra task was roughening up the inner plastic surface of the mouse to give it a whiter finish that is harder to see through and so the Blue colour would come out more (plastic seems more white when sanded lightly).
<< Back To Page 2: Probing
|| On To Page 4: Conclusion >>
|